Self Build Advice: 4 – Planning
Categories: Self Build Advice
To build your new home you will need full planning permission from your local council for the scheme you are proposing. The planning process can seem daunting if you haven’t been through it before, so we’ve put together a brief outline of what’s involved to help demystify the system.
Planning Submission –
You will need the following documents to apply for planning permission:
- Application Form – this can be downloaded from your local council’s website and will require information on what you are proposing to build.
- Location Plan – this will specify where you are proposing to build.
- Planning Statement – also known as a Design, Access & Planning statement, this is a detailed argument of why you think the plans should be approved. The idea is to try and get the planning officers on board with your build.
- Existing Site Plan – a survey of your plot of land, this will show; any existing buildings, surrounding properties, levels, boundaries, tree positions etc.
- Proposed Site Plan – how the plot will look once the build is complete.
- Existing Dwelling Plans – if you are looking to knock down an existing building and rebuild you’ll need to include plans of the current dwelling. Typically, there will be a certain percentage increase in volume allowable for the new property.
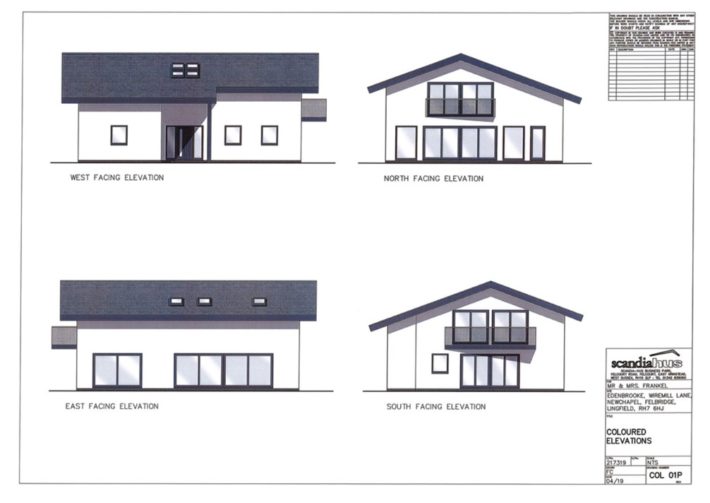
- Proposed Elevations – drawings of your self-build home. 3D visualisations can help bring the proposal to life so include these if you can.
- Proposed Floor Plans – the layout of the new house.
- Proposed Sections – this is a cut-through of the building showing the construction details of walls and roof structures.
- Site Sections – this is a cut-through of the land.
- Street Scene – how does the new building relate to its immediate neighbours? Take a look at the general architectural characteristics of nearby properties such as size, shape, ridge heights and materials.
- Landscape Scheme – this specifies where paths, patios and planting will be when the project is finished.
- Surveys – it may be necessary to include tree or ecological surveys, flood risk assessments or even a heritage statement, depending on the plot of land and location.
- C.I.L Forms – the Community Infrastructure Levy is essentially a development tax to stop large construction projects happening without benefit to the community. The fee goes towards improving local infrastructure. Self-builds are exempt from this but a form will still need to be filled out.
Planning Process –
So you’ve collated all the information and documents required, what’s next?
- Registration with Council – submit the documentation to the council, they will ensure they’ve received everything they need.
- Validation Letter – the council will issue you with a validation letter. This will specify the proposal’s determination date (typically 8 weeks after validation), the application number (you can use this to track the application on the council’s website) and details of the planning officer involved.
- Consultation – once validated, your scheme will be sent out for consultation. This is where immediate neighbours and anyone else who may have an interest in the land (for example the parish council, ecologists, heritage officers), will receive a letter outlining the proposal. Recipients have 21 days to put forward their comments.
- Contact/Negotiation – the planning officer will have collated the consultation comments and written a report. At this stage, it’s sensible to begin talks with the planner to negotiate and amend plans if needed. For example, a neighbour may be concerned with overlooking and so a frosted window on that elevation may eliminate any potential dispute.
- Decision Issued
Planning Decisions –
There are three possible outcomes from this process:
Rejected – the scheme is refused planning permission from the council. A list of reasons will be cited. You can either appeal the decision, although this is a lengthy procedure, or go back to the drawing board using the feedback to alter the build and reapply.
Withdrawn – if at the contact stage the planning officer indicates that they are thinking of refusing the proposal it may be advisable to withdraw the application. It could be that the changes they’re seeking are too substantial to be dealt with as just an amendment and so removing and revising the plans may be the best course of action.
Accepted – the ideal situation! However, it is typical for there to be conditions attached to the approval.
- Materials – you will need to provide photos or samples of the proposed materials prior to starting construction. This is particularly relevant in protected areas (such as National Parks or Areas of Outstanding Natural Beauty).
- Tree Protection – if any trees are identified as needing protecting then this will need to be adhered to.
- Removal of PD Rights – if the project is fairly substantial then the council may take away the permitted development rights of the land. This doesn’t necessarily mean you won’t be able to build an extension or garage but you’ll have to go back through the planners to do so.
- Commencement – as soon as approval is received you’ll have three years to start works on site. You are not required to finish within that time period, just to begin the build.
- C.I.L – As a self-builder, you are exempt from the Community Infrastructure Levy, so as long as you submitted your form with planning then no fee will be payable. The condition with this is that you have to live at the property for 3 years. If for some reason you move earlier then this charge will be owed. The fee structure is priced per sq.m. For a rebuild, this is calculated on the additional space, on a virgin plot the whole floor area will be used.
Comments are closed.